The Incredible Helix Line Follower Track

Materials:
-
Two 4' x 8' sheets, 4mm thick white (not opaque) coroplast sign board material
-
Four PVC pipes: 2” diameter/18” long
-
One PVC pipe: 3” diameter and cut to fit your tripod base
-
Three PVC 2” couplings
-
One PVC adapter: 2” to 4”
-
16 wooden dowels: 3/8” diameter/2' long
-
White duct tape
-
Black electrical tape
-
Clear packing tape
-
Painter's tape
-
Telescopic adjustable tripod stand >8' tall when fully extended (Here's what we purchased from Amazon - Heavy Duty Light Stand)
-
Short, small bolt and nut (any size will do)
Tools:
-
Electric hand held jigsaw with universal fine tooth blade
-
Dremel Tool
-
Drill press
-
Bandsaw or hacksaw
-
3' rigid ruler/yard stick
Step One: Cut Track Rings
-
Take two sheets of coroplast and cut them in half to make four (4’x4') square pieces.
-
Stack the four squares and tape them together using painter's tape.
-
Drill a hole at the end of your yardstick that matches the size of your small nut/bolt combo.
-
Drill a matching hole, in the EXACT CENTER of the stack of square coroplast pieces.
-
Drill two more holes in the yardstick (spaced at 14” and 24” from the first hole ).
Pro Tip: Make these two holes smaller. We will be using them to draw the circles we need, using a pencil. Think “spirograph.”
-
Bolt your fancy spirograph yardstick to the center of the coroplast stack.
-
Using a pencil and the smaller holes in the yardstick, draw two concentric circles on the top coroplast square.
-
Remove the yardstick.
-
Using your jigsaw, cut the outer circle first.
-
Tape the four circles together using painter's tape.
-
Drill a starter hole for your jigsaw blade along the inner circle’s outline.
-
Cut the inner circle.
IMPORTANT: When cutting, be sure to keep all four inner circle cutouts intact. Two of these little donut holes will be used later to create the turn-around areas for the upper and lower platforms. The other two donut holes will be used to create the “shark fin” track adapter to connect the track rings to the track platforms. -
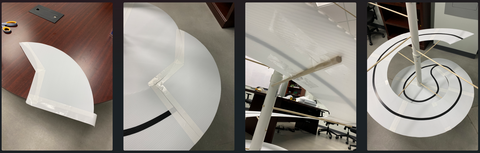
Now turn those donuts into track rings by cutting a seam in a VERY straight line as shown in the photo below! .

-
While using a track ring and a track platform as a guide, draw a “shark fin” shape on a donut hole to join the track to the platform. See photo below for an example. Make two of these “shark fins”, one for each of the platforms.
Step Two: Create the Track Tree Trunk (say that ten times fast)
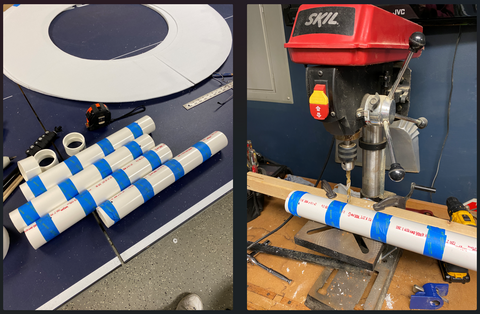
To allow the tripod to go through the pipes, the dowels need to be inserted into the pipes off-center, close to the edge of the pipe. Space the holes 4 1/2” apart and rotated 90 degrees from each other. The picture below gives you an idea of how the holes should be drilled.

Note how the dowels are positioned off-center to allow the trunk of the tri-pod to pass through the PVC pipes.
-
Cut 2” diameter PVC pipes down to four 18” pieces. This can be done using a bandsaw, hacksaw, or equivalent.
-
Use painter’s tape to mark the distances to be drilled.
Step Three: Cut Base PVC
This step is possibly optional and definitely dependent on the tripod you purchase. The images below will give you an idea of what we are shooting for. The whole objective of this piece is to support the lower platform track piece. You can use a Dremel tool to cut the slots for the tripod base.

Step Four: Want to take it on the road? Make it travel size!
This step is also optional, but if you would like your track to be travel friendly (or easily stored in a small place), read on!
Depending on how small you want your track to be will determine how many sections you will need to cut the track rings into. Ideally, it would be best to keep the track rings in their original shape if you have the room to store them, but you can cut them in halves, in quarters, or even in eighths as shown here for maximum portability.

-
Mark where you will cut each section using a pencil and a ruler. Be careful to make each “slice” of this pie equal in size.
-
Place painter’s tape between the lines to hold all four rings together.
-
Cut each slice carefully and be sure to organize the section order for each ring.
-
While working one ring at a time on a flat surface, tape (using white duct tape) every other, top and bottom track section seam so that each track ring can be folded up like an accordion. Be sure to leave one seam open (not taped).
Step Five: Some Assembly Required
Now it’s time to put it all together and make one AWESOME track!
-
Set up your tripod per the manufacturer’s instructions. You may need to replace the plastic wing nuts with smaller standard nuts
-
If needed, add the custom base PVC pipe you created in Step 3.

-
Remove all of the tripod’s upper poles leaving only the lower pole attached to the legs.
-
Make a hole in the center of one of the donut hole cutouts from Step 1 for a snug fit over the tripod’s lower pole. This circular cutout will be used for the track’s lower loopback platform.
-
Place this platform over the tripod’s pole onto the tripod base.
-
Replace the remaining tripod poles along with each PVC pipe one at a time.
-
Connect all four PVC pipes with the three couplings making sure that the dowel holes line up correctly between each pipe.
-
At the top add the PVC 2” x 4” adapter. This will help support the upper loopback platform.
-
Add the upper loopback platform.
-
Insert all 2' wooden dowels in all four PVC pipes.

- On a smooth surface, place black electrical tape down the center of all four track rings.

-
Position the first track ring on the lower four wooden dowels and use the shark fin adapter to connect the track ring to the lower track platform.
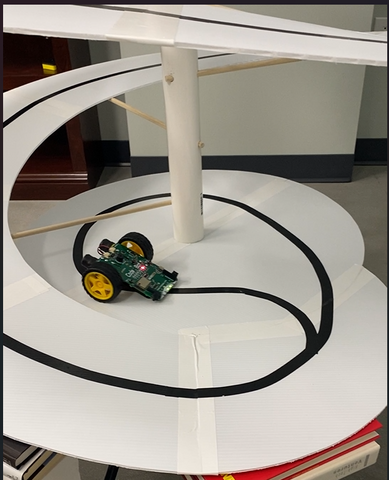
IMPORTANT: Make sure that the CodeBot has enough clearance to drive under the lowest wooden dowel. If more clearance is needed, simply rotate the PVC pipe assembly until just enough clearance is made. -
Use white duct tape to attach the track ring to the track adapter and then to the track lower platform.
-
Use clear packing tape to attach the wooden dowels to the underside of the track ring.
-
Make the lower loopback line on the shark fin and the lower platform with black electrical tape. See photo below as an example.
-
Continue up the tripod with the remaining three track rings.
-
Attach the upper shark fin to the upper platform with white duct tape.
-
Make the upper loopback line on the shark fin and the upper platform with black electrical tape.
-
Support the remaining wooden dowels to the underside of the track with clear packing tape as needed.

That’s all there is to it! Time to grab your CodeBot and test out your new Incredible Helix Line Follower Track!